编辑文章
在文章发布过程中/之后,难免需要继续/重新编辑。
1. urls.py
编辑 blog/urls.py ,添加编辑文章链接。
添加这一句:
url(r'^article/(?P<title>\w+\.?\w+)/edit$', ArticleEditView.as_view(), name='article_edit'),
添加之后 urls.py 文件内容如下:
from django.conf.urls import url

from views import ArticlePublishView, ArticleDetailView, ArticleEditView

urlpatterns = [
    url(r'^$', 'blog.views.blog_index', name='blog_index'),
    url(r'^article/publish$', ArticlePublishView.as_view(), name='article_publish'),
    url(r'^article/(?P<title>\w+\.?\w+)$', ArticleDetailView.as_view(), name='article_detail'),
    url(r'^article/(?P<title>\w+\.?\w+)/edit$', ArticleEditView.as_view(), name='article_edit'),
]
可以看到,访问文章的 url 也被修改了。之前的 \S+ 匹配不是说不行,只是如若编辑文章的链接如下的话:
url(r'^article/(?P<title>\S+)/edit$', ArticleEditView.as_view(), name='article_edit'),
此 url 匹配会被
url(r'^article/(?P<title>\S+)$', ArticleDetailView.as_view(), name='article_detail'),
先匹配到,所以才做出了上面的修改。
\w+\.?\w+ 解释:
\w+是匹配单词字符([ A-Za-z0-9_ ])一个或多个;\.?匹配.一个或零个(目的是为了不管有没有.html都可以匹配)。
2. views.py
添加 ArticleEditView 类,继承 FormView 视图类。
from django.core.urlresolvers import reverse


class ArticleEditView(FormView):
    template_name = 'article_publish.html'
    form_class = ArticlePublishForm
    article = None

    def get_initial(self, **kwargs):
        title = self.kwargs.get('title')
        try:
            self.article = Article.objects.get(title=title)
            initial = {
                'title': title,
                'content': self.article.content_md,
                'tags': self.article.tags,
            }
            return initial
        except Article.DoesNotExist:
            raise Http404("Article does not exist")

    def form_valid(self, form):
        form.save(self.request, self.article)
        return super(ArticleEditView, self).form_valid(form)

    def get_success_url(self):
        title = self.request.POST.get('title')
        success_url = reverse('article_detail', args=(title,))
        return success_url
解释/注意几点:
- 可以看到表单还是使用的是发布文章表单
ArticlePublishForm - get_initial 函数为
FormView类自带函数,用来初始 form 表单的值 - get_success_url 函数也为
FormView类自带函数, 用来返回当表单成功保存后的跳转页面链接 form.save函数添加了一个参数article
3. forms.py
class ArticlePublishForm(forms.Form):
    title = forms.CharField(
        label=u'文章标题',
        max_length=50,
        widget=forms.TextInput(attrs={'class': '', 'placeholder': u'文章标题,记得在标题末尾添加".html"'}),
        )

    content = forms.CharField(
        label=u'内容',
        min_length=10,
        widget=forms.Textarea(),
        )

    tags = forms.CharField(
        label=u'标签',
        max_length=30,
        widget=forms.TextInput(attrs={'class': '', 'placeholder': u'文章标签,以空格进行分割'}),
        )

    def save(self, username, article=None):
        cd = self.cleaned_data
        title = cd['title']
        title_zh = title
        now = datetime.datetime.now()
        content_md = cd['content']
        content_html = markdown.markdown(cd['content'])
        re_title = '<h\d>(.+)</h\d>'
        data = content_html.split('\n')
        for line in data:
            title_info = re.findall(re_title, line)
            if title_info:
                title_zh = title_info[0]
                break
        url = '/article/%s' % (title)
        tags = cd['tags']
        if article:
            article.url = url
            article.title = title
            article.title_zh = title_zh
            article.content_md = content_md
            article.content_html = content_html
            article.tags = tags
            article.updated = now
        else:
            article = Article(
                url=url,
                title=title,
                title_zh=title_zh,
                author=username,
                content_md=content_md,
                content_html=content_html,
                tags=tags,
                views=0,
                created=now,
                updated=now)
        article.save()
基本上在原来的基础上没有大的改动,就是在 save 函数中添加了一个参数 article,想必直接看代码就能够理解了。
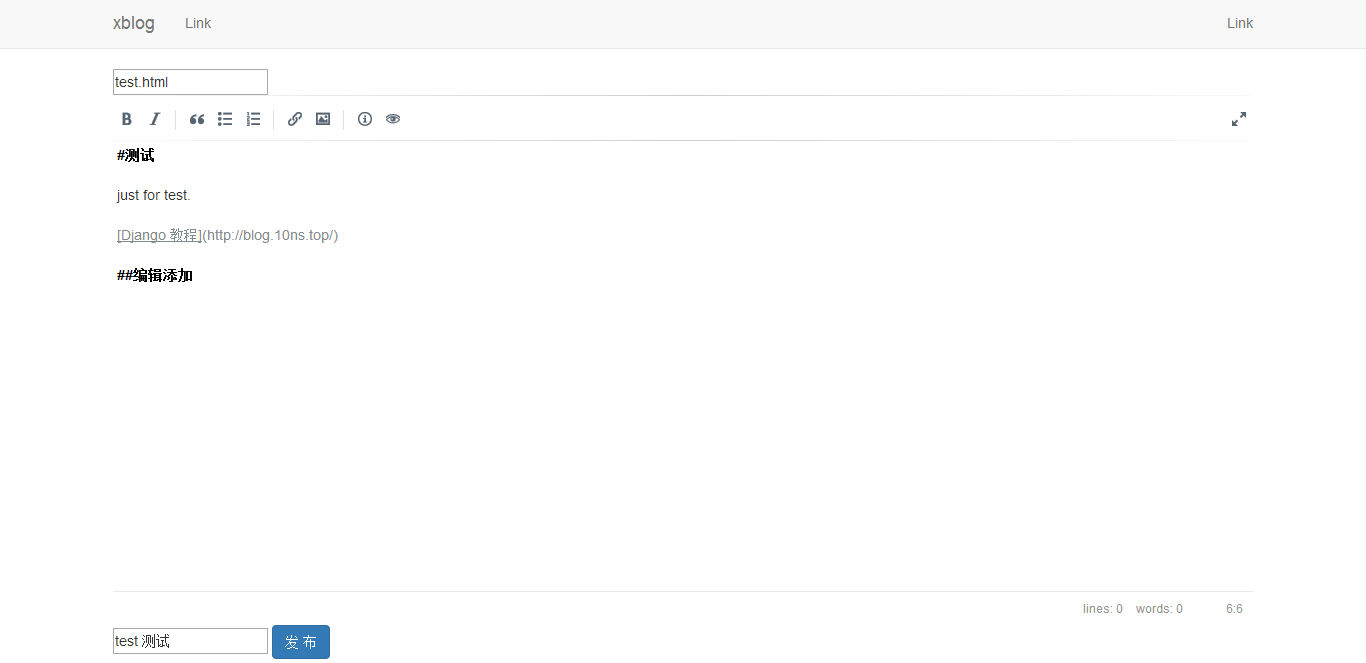
4. 查看效果
在浏览器中直接输入:http://192.168.1.221:8000**/blog/article/test.html/edit**
效果图如下:

编辑后发布,直接跳转到文章显示页面。
注:链接地址(也就是文章 title)不要频繁更改,如果此篇文章已被 google 等收录,则最好就不要再修改了。
5. 后续
- 可在文章页面中添加编辑文章的按钮,此在后续章节具体讲述。